When I was little, I HATED mayonnaise, along with most condiments or toppings. The only topping that was acceptable (and also expected) on a hamburger or hot dog was cheese – and lots of it! At some point in high school, I realized that mayonnaise was not the gross condiment I thought it was and my world has been better since.
The problem with store-bought mayonnaise is that most are made with inflammatory oils, soybean oil being the most prominently used. Since mayo is a common condiment used by many on sandwiches, in dressings, dips, and other dishes, it’s one ingredient that many would benefit in using a version that’s more supportive of their health.
Last year, I was searching for alternatives to mayo made with soybean oil. I found that the ingredient list of most name-brand mayonnaise that market the use of other oils still reveal a mix of soybean oil in addition to whatever oil they’re claiming (e.g. olive oil or sunflower oil). I tried several brands of avocado oil mayonnaise but found that all had an off-putting flavor, and were nowhere close to the traditional mayo taste you’d expect.
After trying many versions of alternative oil mayos, I resorted to making my own. Despite my fears around the emulsion process and the use of raw eggs, I am now a wholehearted homemade mayo advocate and I hope you will become one, too. Do I sometimes use store-bought? Yes, in a pinch if I absolutely don’t have time to make mayo. However, I try to plan ahead as much as I can because I truly prefer the taste of homemade mayo and I feel better knowing that I’m consuming ingredients that are better for my family.
Homemade mayo tastes delicious – it’s richer and has a creamier texture than the name-brand mayonnaise I had been used to. Plus, this version uses extra virgin olive oil which is an unrefined healthy fat high in Omega-3 fatty acids.
If you’ve avoided making homemade mayo because of the process and time involved, I am pleased to inform you that the whole process takes less than 10 minutes. If the steps feel daunting to you, know that they were daunting to me at first as well. I urge you to go ahead and try it and you’ll see that the process is far easier than you think, and rewards you with a delicious treat to be used in a variety of dishes and meals.
If you’ve avoided making homemade mayo because of the raw egg, I hear you and you have some options. You can purchase pasteurized eggs from the grocery store or you can pasteurize your egg at home if that will give you peace of mind. The steps below provide my process for making mayonnaise which includes a pasteurization step. This does not guarantee that the egg is in fact pasteurized and you should still make your own choice about how you’re most comfortable using raw egg in this recipe. My personal choice is that the benefits of having homemade mayo outweigh the small risk of salmonella. There are other methods of home pasteurization that you can find by doing a quick search of “pasteurizing eggs at home.” Many sources suggest placing the egg(s) in a pot of water, heating it to a temperature of 140 degrees Fahrenheit and then allowing the egg(s) to remain in the heated water for a minimum of 3 and a maximum of 5 minutes. There are other methods provided online as well.
This recipe was developed after reading many homemade mayo recipes online and pulling different pieces from several sources, from the ingredients to the methods used.
If you’re more of a visual learner, watch our how-to video below!
Homemade Mayonnaise (Mayo)
Equipment
- Immersion blender, food processor or standard blender
Ingredients
- 1 Large Egg* , Room Temperature (if you’re in a rush and your egg comes straight from the fridge, submerge it in some slightly warm water before completing step 2)
- 1 c Extra Virgin Olive Oil (it’s best if your olive oil is in a measuring cup that has a pour spout for ease of pouring)
- 1 tbsp Dijon mustard (subsitutions include yellow mustard or 1/2 tsp dry mustard powder)
- 1 tbsp Vinegar (apple cider, white or champagne vinegar all work well – feel free to experiment!)
- 1/2 tsp Salt
Instructions
Egg Pasteurization (Optional)
- Place the egg in a saucepan and fill with enough water to cover the egg. Heat on the stovetop until the water reaches 140 degrees Fahrenheit.
- Let the egg sit in the heated water for a minimum of 3 and a maximum of 5 minutes, ensuring that the water temperature remains at least 140 degrees but does not rise over 150 degrees.
- Note: I often pasteurize my egg by heating a cup of water in the microwave for two minutes, carefully lowering the egg into the hot water, setting a timer for 5 minutes, and then using my egg from there. This method is not as precise as the stovetop method and may not be fully pasteurizing your egg, so you'll need to decide what approach works best for you. I have also used raw eggs straight from the carton, so the microwave approach is not concerning to me personally.
Making the Mayo
- If you’re using an immersion blender, place the mustard, salt and vinegar in a small bowl or mason jar with a wide enough mouth to fit the blender inside. If you’re using a food processor or blender, place the ingredients in the associated appliance bowl or container. (If pasteurizing your egg, I find it easiest to complete this step before the pasteurization process so that it doesn't slow me down once my egg is ready).
- If you did the pasteurization step, carefully remove the egg from the hot water and crack the egg into the bowl with the other ingredients. You may see that some of the white has started to cook through – that’s okay, it will blend together. If you did not do the pasteurization step, simply crack the egg into the bowl with your other ingredients.
- Turn the blender on and mix the ingredients until well combined.
- While still blending, pour a tiny amount of oil into the bowl and blend thoroughly (see note if your appliance does not allow you to add ingredients while blending).
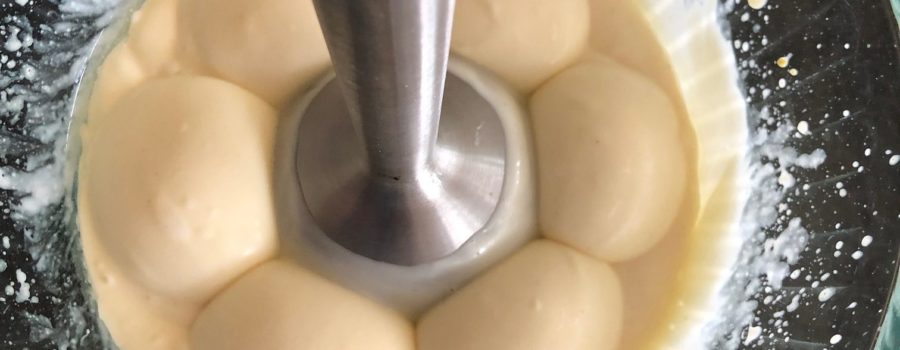
- Repeat this process, pouring a tiny amount and mixing thoroughly until you see the mixture start to change color and the bubbles start to go away. Check out the photo (or watch the video) for how it should look at this stage.
- Begin pouring the oil in a steady stream while you hold the blender with the other hand. The mixture will emulsify and change to a pale creamy white color, and it will start to develop the texture of mayonnaise that you’re familiar with.
- Continue until all the oil has been poured into the bowl and blend until the texture is thick. For me, I know that the mayo is perfect when I can lift the immersion blender up slowly and back down and it creates the shapes shown in the photo.
- Transfer the mayo to a tightly sealed container (or simply place the lid on the mason jar and refrigerate. The mayonnaise will thicken and set after a few hours in the fridge. However, you can also use it immediately, it will just be warmer and a looser texture.
Video
Notes
- If you’re using a food processor or stand blender, follow the steps in the recipe, simply pouring the oil in through the opening or spout. If your appliance does not have an opening or spout, you’ll need to stop the machine each time you add oil. Instead of pouring the oil in a steady stream once it begins to emulsify, you’ll need to pour in increments of larger amounts, blending in between to incorporate all oil before adding in the next increment.
- Storing and Use: I try to use my homemade mayo within a week of making it. Online sources suggest homemade mayo can be stored longer, and I have used mayo longer than a week old as well. Use your best judgement. I also try to plan my meals so that if I make a batch of mayonnaise, I am planning to use it all in a single recipe or for a few different dishes or meals.


